
How to Add Range Slider in Flutter
Restored from an archived FlutterDocs resource. Code examples and APIs may refer to earlier Flutter/Dart SDK versions.
In this example, we are going to show you how to add a range slider for two values with the RangeSlider widget in Flutter. A range slider is important for components like a price slider or any range configuration. See the example below:
How to Add RangeSlider in Flutter:
double startval = 0, endval = 0.5;
//iniital value for start range and end range
RangeSlider(
//by default, min-max: 0-1
values: RangeValues(startval, endval),
onChanged: (RangeValues value) {
setState(() {
startval = value.start;
endval = value.end;
});
},
)By default, the minimum and maximum range will be 0 to 1, so you have to pass the start and end values between 0 and 1. If you want a greater number of ranges, then you can set your own min and max values, like below:
How to Set Min and Max on RangeSlider in Flutter:
//iniital value for start range and end range
double startval1 = 20, endval1 = 70;RangeSlider(
min: 0,
max: 100,
values: RangeValues(startval1, endval1),
onChanged: (RangeValues value) {
setState(() {
startval1 = value.start;
endval1 = value.end;
});
},
)You can also add slide interval division and a label for values, too.
How to Set Interval Division and Label on RangeSlider:
//iniital value for start range and end range
double startval1 = 20, endval1 = 70;RangeSlider(
min: 0,
max: 100,
divisions: 10, //slide interval
labels: RangeLabels("Rs. $startval1", "Rs. $endval1"),
values: RangeValues(startval1, endval1),
onChanged: (RangeValues value) {
setState(() {
startval1 = value.start;
endval1 = value.end;
});
},
)Full App Example:
import 'package:flutter/material.dart';
void main(){
runApp(MyApp());
}
class MyApp extends StatelessWidget{
@override
Widget build(BuildContext context) {
return MaterialApp(
theme: ThemeData(
useMaterial3: false
),
home: Home(),
);
}
}
class Home extends StatefulWidget{
@override
_HomeState createState() => _HomeState();
}
class _HomeState extends State<Home> {
double startval = 0, endval = 0.5;
//iniital value for start range and end range
double startval1 = 20, endval1 = 70;
@override
Widget build(BuildContext context) {
return Scaffold(
appBar: AppBar(
title: Text("RangeSlider in Flutter"),
backgroundColor: Colors.redAccent
),
body: Container(
padding: EdgeInsets.only(top:20, left:20, right:20),
alignment: Alignment.topLeft,
child: Column(
crossAxisAlignment: CrossAxisAlignment.start,
children: [
Text("Start Value: $startval", style:TextStyle(fontSize: 20)),
Text("End Value: $endval", style:TextStyle(fontSize: 20)),
Text("Start Value1: $startval1", style:TextStyle(fontSize: 20)),
Text("End Value1: $endval1", style:TextStyle(fontSize: 20)),
RangeSlider(
  //by default, min-max: 0-1
  values: RangeValues(startval, endval),
  onChanged: (RangeValues value) {
        setState(() {
            startval = value.start;
            endval = value.end;
        });
  },
),
Padding(padding: EdgeInsets.all(20)),
RangeSlider(
  min: 0,
  max: 100,
  divisions: 10, //slide interval
  labels: RangeLabels("Rs. $startval1", "Rs. $endval1"),
  values: RangeValues(startval1, endval1),
  onChanged: (RangeValues value) {
        setState(() {
            startval1 = value.start;
            endval1 = value.end;
        });
  },
)
],)
)
);
}
}Output Screenshot:
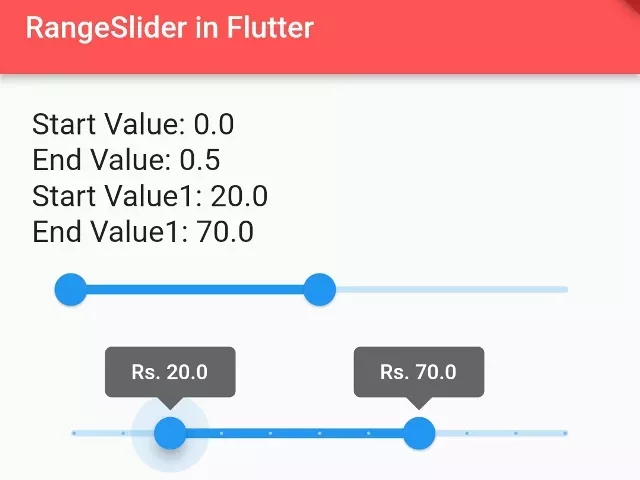
In this way, you can add a Range slider in a Flutter app.